Getting Started
This section walks you through setting up MeshDisplay for the first time. Everything happens on the touchscreen: you need your Meshtastic radio and a USB-C power supply, and that's all.
Unboxing and First Power-On
What's in the Box
Your MeshDisplay package should contain:
MeshDisplay device
USB-C power cable
Initial Power-Up
Connect the USB-C cable to the MeshDisplay's USB-C port
Connect the other end to a USB power source (5 V wall adapter, computer, or a quality power bank)
The 7-inch screen lights up and the main screen appears within a few seconds
Note
Use a quality 5 V USB-C power supply rated at 1 A or more. Insufficient power may cause restarts or display instability.
On first start the main screen reads No radio paired yet. The next step is to pair your Meshtastic radio.
Prepare Your Meshtastic Radio
Before pairing, check the radio:
Bluetooth is enabled on the radio. It is on by default; it is turned off if the radio has been set to use Wi-Fi or Ethernet instead.
No phone is connected to it. A Meshtastic radio accepts one Bluetooth client at a time. Close the Meshtastic app on your phone, or disconnect it in the app.
You know its PIN. Radios with a screen show a random 6-digit PIN when a device pairs. Radios without a screen use a fixed PIN, 123456 unless it has been changed in the radio's Bluetooth settings.
The radio is within a few metres of the display.
Pairing Your Radio
Open the Radios page
Tap the radio name at the top-left of the main screen (it reads No radio until a radio is paired). The Radios page opens with your paired radios on the left and nearby radios on the right.
Tap Scan
MeshDisplay searches for Meshtastic radios for about 12 seconds. Each radio found is listed under Nearby with its name (for example
Meshtastic_2d1f), its Bluetooth address and its signal strength.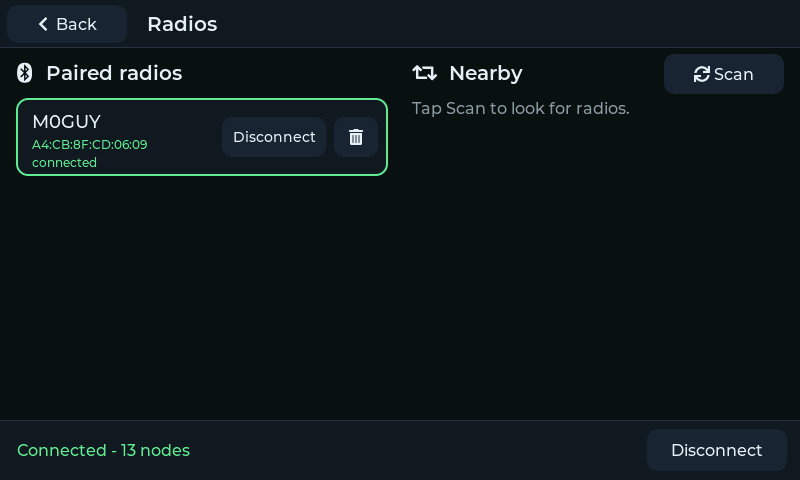
The Radios page: paired radios on the left, radios found by a scan on the right, and the link status along the bottom.
Tap your radio
MeshDisplay connects and the radio asks for its PIN.
Enter the PIN
A PIN pad appears:
Bluetooth PIN

Enter the 6-digit PIN shown on the screen of Meshtastic_2d1f.
The radio waits about 30 seconds.

                - - - - - -

[ 1 ] [ 2 ] [ 3 ]          [ Use 123456 ]
[ 4 ] [ 5 ] [ 6 ]          default for nodes
[ 7 ] [ 8 ] [ 9 ]          without a screen
[ ⌫ ] [ 0 ] [ ✓ ]
                           [   Cancel   ]
For a radio with a screen, type the 6 digits it shows and tap ✓.
For a radio without a screen, tap Use 123456, which sends it straight away (or type the fixed PIN if it has been changed).
Enter the PIN within about 30 seconds; after that the radio gives up and you need to tap the radio again.
Wait for the link
The status bar shows Securing link..., then Connecting to .... MeshDisplay then downloads the radio's channels, its node list and its settings; this takes a few seconds, longer on a busy mesh. When it reads Connected - N nodes, you're ready.
You only pair once. The radio is remembered (under Paired radios) and MeshDisplay reconnects to it automatically whenever it starts, or if the link drops.
Tip
If the PIN is rejected the status shows Wrong PIN. Tap the radio and try again. See Troubleshooting if pairing keeps failing.
Your First Message
Tap Back to return to the main screen. Your channels are listed on the left — the primary channel (usually LongFast) is
#0.Tap the channel. The conversation opens on the right.
Tap the message box at the bottom. The on-screen keyboard slides up.
Type a message and tap Send.
The message appears on the right with a ✓ once your radio has sent it. Replies appear on the left with the sender's name.
Important
Channel messages go to everyone on that channel — on the default LongFast channel that can be every Meshtastic user within range of the mesh. Use a direct message (see Direct Messages) to talk to one person.
Setting Up Wi-Fi (Optional)
Messaging works without Wi-Fi. Connect MeshDisplay to a 2.4 GHz Wi-Fi network to get:
map backgrounds (OpenStreetMap)
software updates
an accurate clock (also available from your radio)
the MQTT gateway
To set it up:
Tap the gear icon at the top-right to open Settings.
On the Wi-Fi row, tap Set up. Saved networks are on the left, nearby ones on the right.
Tap your network under Nearby (tap Scan if it isn't listed).
Type the password on the on-screen keyboard and tap Save and connect.
For a hidden network, tap Other network... and type both the network name and password. Up to three networks can be saved; MeshDisplay joins whichever is available. To remove one, tap the bin icon next to it.
Note
MeshDisplay supports 2.4 GHz networks only. If you have used another TopBytes product on the same hardware (StationMaster, SatTracker, FlightRadar or DX Spotter Pro), its saved Wi-Fi networks are imported automatically on first start.
Next Steps
Learn the main screen, chats, nodes and alerts: Operation
Show your mesh on the map: Map
Choose a theme and adjust the display: Configuration